| Visio 2000 Installation Problems, Some Solutions | |
| Introduction |
The problems detailed here do not include the unrelated installation problems with a Visio 2000 demo, involving the third-party "VBox" demo-protecting software.
Also, numerous other common problems are detailed in the Knowledge Base. Select Visio 2000, and search for "installation".
| General Comments |
Of course, all we customers want is for the installation process to fully understand the current state of an installed product, and move it methodically toward the desired state, by copying some files and setting some registry entries. On these simple tasks MSI may require some manual assistance.
| "Approved" Installation Arrangements |
First, it's as well to note that the way that Visio uses the registry already
implies that only certain configurations are feasible:
| Getting Started |
Beyond that, you should read through the rest of these notes to decide which risks you want to take before forging ahead with the standard installation ritual (insert CD, run Setup).
| Problem: Installation Process Loops After First Reboot |
After this, a required reboot before continuing.
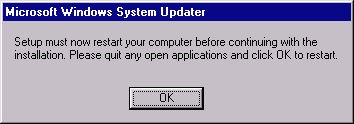
Trouble is, on many machines (as judged by numerous newsgroupsters' reports), after reboot VIM doesn't know that it should continue. If you manually restart Setup.exe, you're back at square-one... installing the MS system components again... and again... etc.
It appears that this is because the installer doesn't wait long enough for the CD to spin up, and just silently bails out.
Fix: Copy the entire installation CD to a spare 400 Meg on your
HD, and install from there. I found this to completely avoid the problem just
described. Bear in mind that a full Visio Ent install takes about 200 Meg.
(... for a total of 600 Megs for this adventure) Yes, I know that copying
files is what VIM is supposed to do for you... but if you get upset at
this point we're never going to get through this...
| Overwrite Existing Install |

If the installer detects an earlier version of Visio, choose to install in the same directory if the prior version was V2K. If the prior version was V5 or before, install to a different directory.
| Problem: VIM Confused About What's Installed |
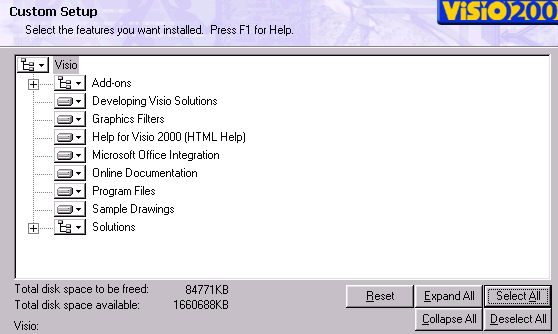
As you can see from the "disk space to be freed", VIM is a little confused... it thinks we're going to actually free 85 Meg by installing everything, clearly impossible... and that goes up to 150 Meg if we select nothing. On further study, it appears that this level of confusion anticipates that a later step in the install will fail.
As a side note, one of the more confusing aspects of MSI-supplied setup
dialog (particularly when you later add/delete features) is that anything
you choose not to install, MSI assumes you want to uninstall. This
means that even if you are just trying to add one new feature, you have to know
whether you want every other feature to end up installed or uninstalled... you
can't just say "leave it as it is".
| Problem: VIM "Cancelled" |
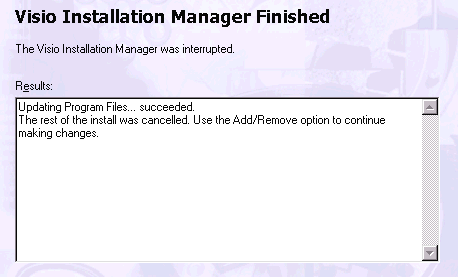
Note that VIM cancels immediately after the Program Files... this is as other users have reported, and relates to a symptom we will see below. The Program Files in fact did not get installed.
Diligent debugging with RegMon showed that VIM was looking for registry keys that weren't present. One might think that it's the job of an installer to figure this kind of thing out for itself, but apparently not.
At this point you can try and repeat the install, or try to uninstall, and if it works, great. Otherwise, read on...
| Time to Regroup |
The basic nature of the problem is that the registry, for whatever reason, has accumulated a combination of keys and values that VIM/MSI doesn't understand, and doesn't know how to recover from. We can get unstuck if we can simply get the registry to "forget" it ever knew about Visio, and forget all the corresponding files.
So we have two choices: (a) engage in a process that involves at least some monkeying with the registry, or (b) reformat the drive and install everything from the OS up. You already know what's involved with (b), so the rest of this article describes how to do (a).
Disclaimer: Of course, the usual Registry disclaimer applies:
"uninformed fiddling with the registry can cause problems"... almost
as many as running an MSI installation :-). Needless to say, if you later
apply for some support (from MS or your local support folks) they may not be so
helpful if they know you've been hacking on the registry.
| Strategy |
There have been newsgroup posts recommending manually deleting certain keys from the registry, and this may work for some. However, by taking a snapshot of the registry before VIM and after VIM I discovered that VIM adds over 6000 keys (yes, six thousand). I did the best I could to sort out which could be safely deleted, and deleted most of those 6000... and that didn't do the trick. So if you want to go down that route, best of luck.
Instead, here's the outline of the process that did work for me. This is not an official Visio-approved procedure, but I did get some unofficial suggestions. :-)
The following sections describe how to do all that...
| 1. Uninstall Using Individual VIMs |
OK, the basic idea at this stage is to right-click > Uninstall for each Visio-related msi file. This invokes MSIExec, which loads the msi file and follows its instructions.
Trouble is, Visio installs over 80 of these MSI files, not very practical to process manually. So I wrote a utility to inspect the entire set, and produce a listing of all showing the Author name, file date etc. This listing file doubles as a batch file to actually launch MSIExec and uninstall using each MSI file in turn... so with some judicious editing you can quickly get this stage accomplished.
You can download this utility here. MSISurv
As you proceed, MSIExec may indicate that uninstall went OK, or may indicate that uninstalling is not applicable if the product is not installed -- OK, no problem. In other cases, there may be an error. That's where you need to inspect the MSI log file....
Side note: Some of these MSIs pop up a puzzling user interface. First, it looks like it's going to install instead of uninstall, but in my testing these actually do perform uninstalls. (Note to whomever might have some authority over MSI: please add as a basic requirement that it should NEVER exhibit between install and uninstall.) Second, it may ask for confirmation but present only a "Cancel" button -- in which case use the Tab key to move OFF the Cancel button, and presumably select the invisible OK button, then hit Enter.
| MSI Logging |
MSI Command line syntax is documented here.
The MSISurv utility generates commands that include request for logging, so no need to activate logging via registry if using that utility.
To activate logging using a registry entry, you set the following keys and values... I chose ultra-verbose. In this example I also set the AlwaysInstallElevated setting, which in theory avoids having MSI get stuck on petty permissions problems.
By default, MSI produces randomly named MSIxxx.log files in the Temp directory (ie: usually C:\Temp) These files use Unicode (not ASCII), which not all text editors can handle, but you can read them in Notepad or Word, and save as text if needed.
Turn On Logging
REGEDIT4

[HKEY_CURRENT_USER\Software\Policies]

[HKEY_CURRENT_USER\Software\Policies\Microsoft]

[HKEY_CURRENT_USER\Software\Policies\Microsoft\Windows]

[HKEY_CURRENT_USER\Software\Policies\Microsoft\Windows\Installer]
"AlwaysInstallElevated"=dword:00000001

[HKEY_LOCAL_MACHINE\Software\Policies]

[HKEY_LOCAL_MACHINE\Software\Policies\Microsoft]

[HKEY_LOCAL_MACHINE\Software\Policies\Microsoft\Windows]

[HKEY_LOCAL_MACHINE\Software\Policies\Microsoft\Windows\Installer]
"AlwaysInstallElevated"=dword:00000001
"Logging"="viwearucmo"
Note: If you stick the above text in a text file, and name it "something.reg", you can load it into RegEdit (or just double click it) and RegEdit will set entries for you. Note the first line must read REGEDIT4 and the syntax requires one blank line between each key (no blank lines between key and values).
Digression on REG files
1. From RegEdit you can export a branch of the registry, (or the entire thing), and later load it back in -- helpful to restore after experimenting.
2. There's syntax for deleting keys and values too, (see later examples).
3. If in doubt about syntax, export a small branch from RegEdit and see what the resulting file looks like.
To Turn Off Logging: Use the following reg file (note the minus sign):
REGEDIT4

[HKEY_LOCAL_MACHINE\Software\Policies\Microsoft\Windows\Installer]
"Logging"=-
| 2. Fix Individual Problems |
In the course of conducting the individual uninstalls, you will hopefully run across one or more which report an error other than "inapplicable because not installed". Since the particular problem that I encountered sounds similar to others reported on the newsgroup, I'll use it as an example:
This problem occurred attempting to uninstall using 3a61cd.msi, whose "Title" reads "Visio 2000 Engine" (but your filenames may vary). This corresponds to the "Program Files", the component at which the full VIM installation seems to get stuck and cancel.
Running this msi brought the alert message: "The system administrator has set policies to prevent this installation." This could lead you on a detour to try and figure out how MSI policies work, which in fact led me to setting the AlwaysInstallElevated value (as noted above)... but that didn't fix the problem.
However, studying the end of the installer log file was informative:
[...]
MSI (s) (56:C2): Searching for item Products\2DD6FE361F1F2D11F9920006808AE88C in per-machine key
MSI (s) (56:C2): Found item Products\2DD6FE361F1F2D11F9920006808AE88C
MSI (s) (56:C2): Note: 1: 2720 2: 2
The system administrator has set policies to prevent this installation.
C:\WINNT\Installer\3a61cd.msi
MSI (s) (56:C2): MainEngineThread is returning 1625
=== Verbose logging stopped: 10/30/00 15:47:16 ===
Using RegEdit to search for and inspect this key, it appeared that unlike nearby peer-level keys it was missing subkeys. So I exported the key (in case I needed to restore later) and then deleted the key.
It was then possible to successfully complete the uninstall using this particular msi file. I suspect that this "fixup" was the most significant trick in this whole sorry adventure. Apparently if this key is not just right then the individual msi procedure interprets this as an "adminstrative rights" problem. The full VIM process sees this as an order to cancel and doesn't think it would be helpful to provide further explanation.
| 3. Delete Certain Registry Branches |
A couple of registry branches are apparently particularly important to delete, and this can be done with a reg file with the following contents:
REGEDIT4

[-HKEY_LOCAL_MACHINE\SOFTWARE\VISIO]

[-HKEY_CURRENT_USER\SOFTWARE\VISIO]
Note the minus sign to tell RegEdit to delete. You can load this file into
RegEdit, or just double-click it in Windows Explorer.
| 4. Delete Files |
| Proceed to Run Install! |
At this stage, you should be able to run the full installation to completion. You may want to burn some incense or sacrifice a goat or two just to be on the safe side. But wait, that's not all!
| Problem: MSI Fails To Copy Correctly |
In a finish worthy of Fatal Attraction, the horrible legacy of MSI might still
rise from the bathtub (where, if not drowning, it should at least be
receiving a well-deserved scrubbing). When you eagerly attempt to launch
your freshly installed Visio, you may see THIS..
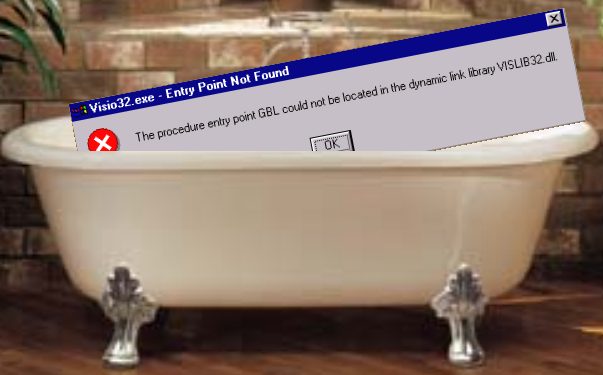
This GBL message is due to MSI not correctly copying the guts of Visio, VisLib32.dll. That file is all of 5 Meg, but judging by the several reports of this problem on the newsgroups, I guess this counts as heavy lifting for MSI, and sometimes it doesn't quite get it right, presumably because MSI is so distracted by its other duties, tending to thousands of registry entries, healing the wounded applications, and ensuring that everything stays secure.
But copying a 5 Meg file is mere child's play for us... just locate the file in the installation source:
...\Install\bin\Program Files\Visio\VisLib32.dll (or use Find)
... and copy it into place. Given this confidence-shaking experience it's tempting to copy the entire installation source to the target directories just in case, but if so bear in mind that when copying from a CD the target folders and files wind up with a "Read Only" attribute. Not a problem for the executables, but for editables (like sample files and others) it's a hassle. You can unset Read Only by selecting one or more files in Explorer and using Properties. Or, to fix a whole directory tree, use the command-line Attrib command (open a Command window, and use "attrib /?" to get details).
The GBL problem is also discussed in this Knowledge Base article, though in my opinion this is an MSI bug, not just a random accident.
OK, that should about do it. If not, feel free to consider your system royally screwed up.
Article Created: 2000-10-30 Last edit: Last edit: 00-11-01 Graham Wideman
Go to: DiagramAntics.com